Making a simple ESP8266based clock synchronized to NIST server Embedded Lab
ESP8266 NodeMCU Internet Clock with ST7735 TFT 4 Comments / By Simple Projects / September 17, 2019 This post shows how to implement internet clock using ESP8266 NodeMCU Wi-Fi board where time and date are displayed on ST7735 TFT display.
esp8266 clock with wemos d1 mini and… EverythingESP
ESP8266-ESP01 Local Time Internet Clock with OLED SSD1306 IoT Datasheets ESP8266-ESP01 Local Time Internet Clock with OLED SSD1306 5 months ago by Wajid Hussain 7,309 views Contents hide 1 Introduction 2 Hardware Component 3 ESP01 Internet Clock Circuit 4 Program the ESP-01 5 Code for ESP01 Introduction

ESP8266 NodeMCU clock with SSD1306 OLED YouTube
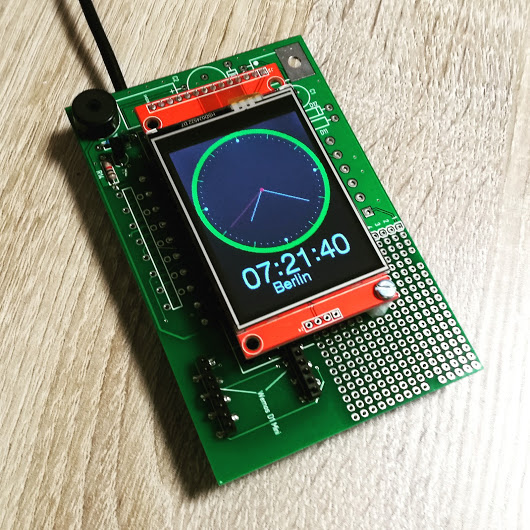
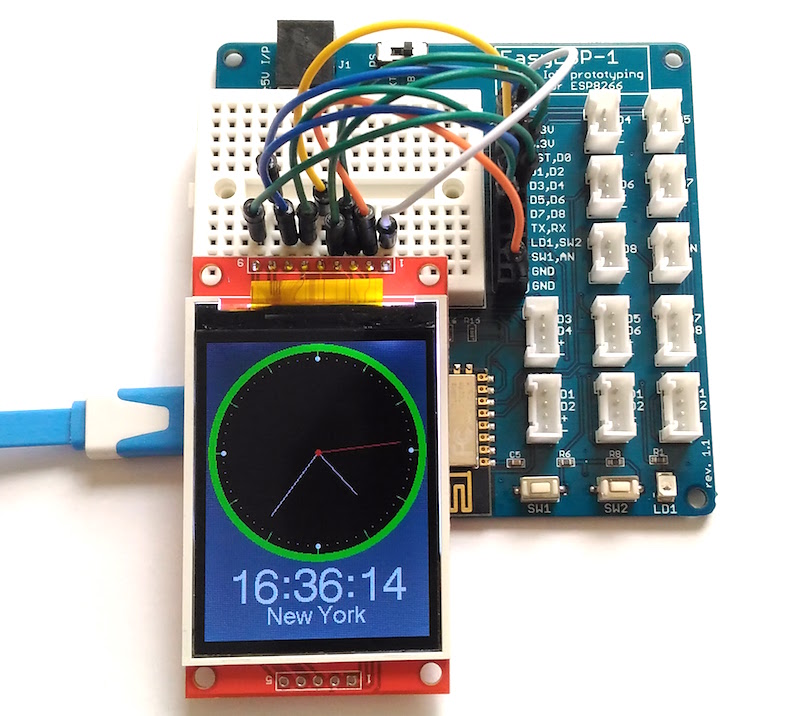
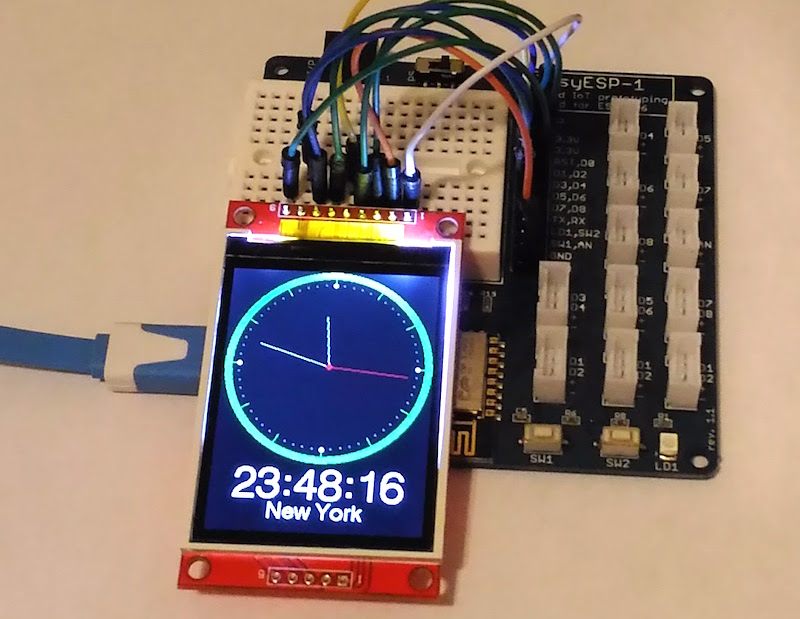
This tutorial describes how to build an ESP8266-based internet clock that uses NIST's NTS service to retrieve accurate time information. The time is displayed on a colorful TFT LCD (ILI9341 driven) in both analog clock dial and digital formats. The time is synchronized to the NIST server in every 2-minute interval. ESP8266 Internet Clock Hardware

ESP8266 NodeMCU clock and weather station YouTube
This 7-pin OLED display communicates with ESP8266 module using SPI protocol, below are the circuit diagram and connections table to connect OLED SPI pins with NodeMCU to display Internet time.

Clock using 16x2 LCD and ESP8266 WIFI Module
Step 1: Things You Need for this project you will need following things : Esp8266/nodemcu Oled ssd1306 0.96" Jumper wires Breadboard Usb cable Ask Question Step 2: Connections

ESP8266 NodeMCU Clock with ST7735 TFT Simple Circuit
You can connect your ESP8266 to your wifi network and it will be a clock which will be synchronized with network, so if once you Uploaded the code it will get time from internet so it will always display correct time. Ask Question Step 1: Things You Need For this project you'll need very few things : ESP8266/NODEMCU A USB cable to program it.

ESP8266 Clock, Weather Station and Information Display YouTube
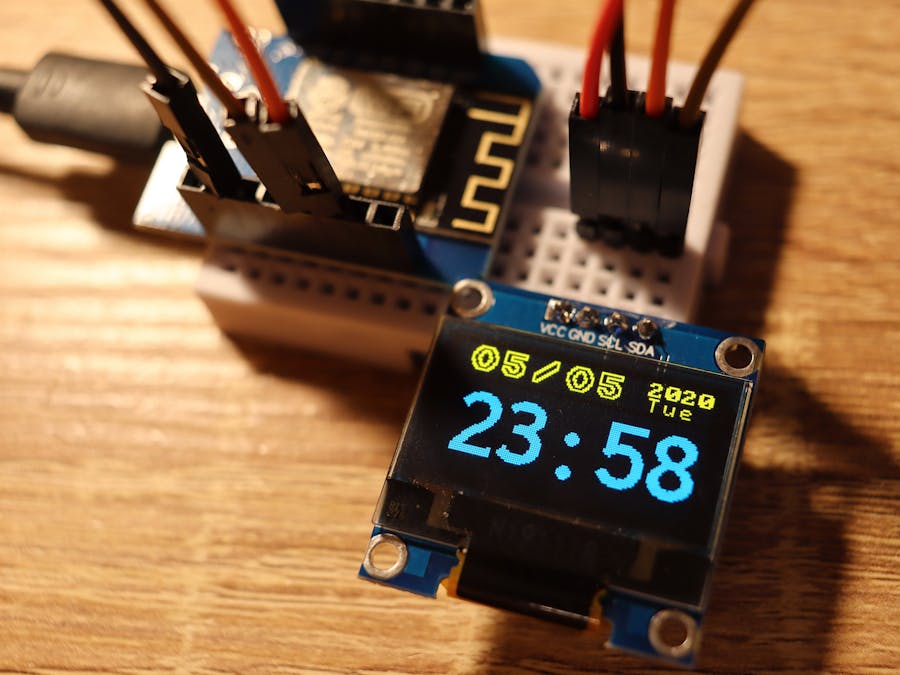
The WiFi capabilities of the ESP8266 based Wemos D1 mini will be used in obtaining time information from a public NTP server and it will be displayed in a user-friendly manner on an OLED display.
ESP8266 NTP Clock on SSD1306 OLED (Arduino IDE) Hackster.io
What you need to build this ESP-01S ESP8266 | https://s.click.aliexpress.com/e/_DCSnIAF1.3 inch OLED | https://s.click.aliexpress.com/e/_DkzliYnAMS1117 3..

P10 Clock using NodeMcu Esp8266 by Manmohan Pal YouTube
Comment Step 1: Bill of Materials 1. 1 X ESP8266-12E Module ( Gearbest.com) 2. 2 X MAX7219 Dot Matrix Module 4 in One Display ( Gearbest.com) 3. 1 X AMS1117 Power Supply Module ( Gearbest.com) 4. 1 X DC 12V 1A Power Supply ( Gearbest.com) 5. 1 X LM7805 Voltage regulator and jumper wires Tools Require 1.

NODEMCU ESP8266 animated clock on 8x8 Led matrices YouTube
Step 1: Things Needed Here are the things that you will need to make ESP Matrix: Wemos D1 Mini - ESP8266 MAX7219 LED Dot Matrix Panel Dupont cable - Included in LED Dot Matrix Panel OTG Adapter Micro USB cable 3D Printed Case Pieces of transparent colored Acrylic 129x32x3mm
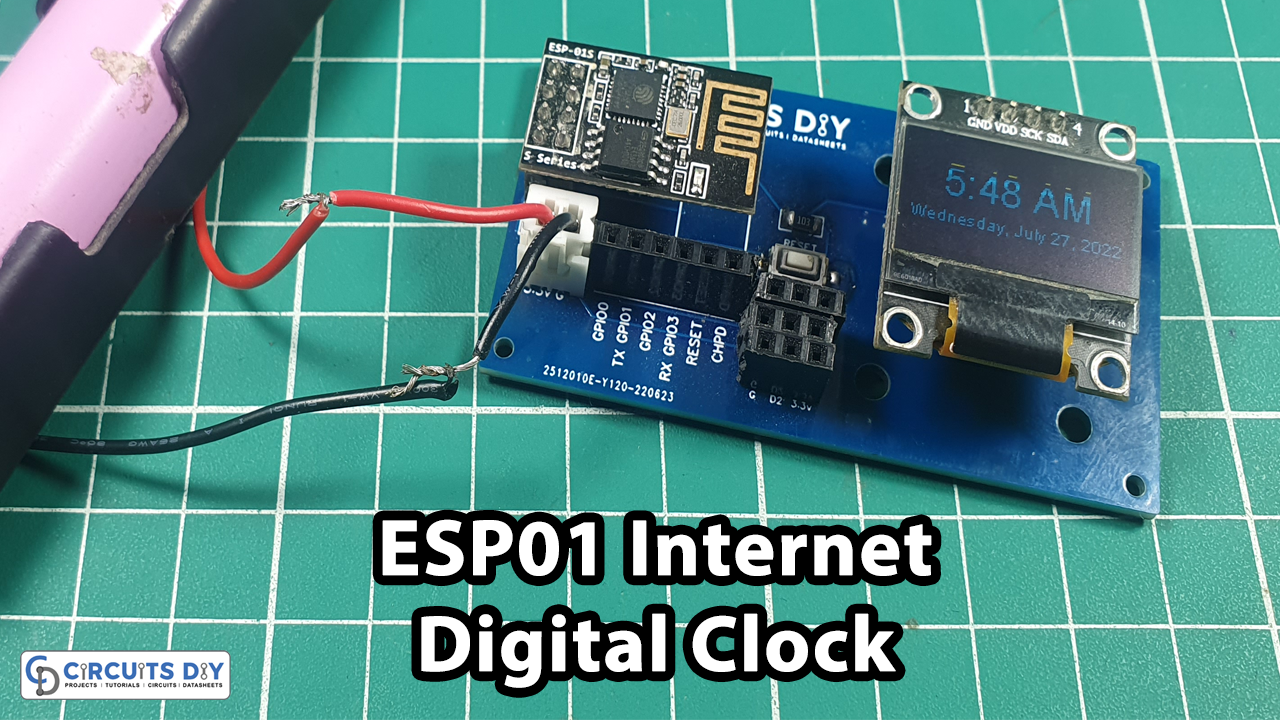
ESP8266ESP01 Local Time Clock with OLED SSD1306
Code and Circuit Diagram-https://drive.google.com/drive/folders/1U5EvZwRtjDUJ0LeD96mb2BV5lToaS4hc?usp=sharingESP board extension-http://arduino.esp8266.com/s.
Tutorial 8 ESP8266 clock Embedded Lab
Step 1: Basic Setup With ESP8266 Board We first start by preparing a Breadboard setup first, we place the ESP8266 Nodemcu board and OLED on a Breadboard and do the following wiring connections. 5V of NodeMCU to VCC of OLED Display GND to GND D2 to SDA D1 to SCL

P3 RGB led matrix clock (IOT) esp8266 nodemcu v3 P3 RGB led matrix clock (IOT
This whole setup is made on a custom PCB that has a minimal ESP8266 Setup, but we can prepare this setup by using a NodeMCU with an OLED Display on a breadboard as well. This Article is about the whole build process of this INTERNET CLOCK so let's get started. Material Required. Following are the thing used in this built-ESP8266 12F module.
IoT clock with LED matrix (Arduino & ESP8266) Cassiopeia Ltd
Step 1: Components For this instructable you will need: ESP8266-01 module 128x64 OLED with I2C interface 3.3V power supply A way to program the ESP-01 Ask Question Comment Step 2: Wire It Up! The wiring is simple. Just follow the diagram above and connect the wires.
Tutorial 8 ESP8266 clock Embedded Lab
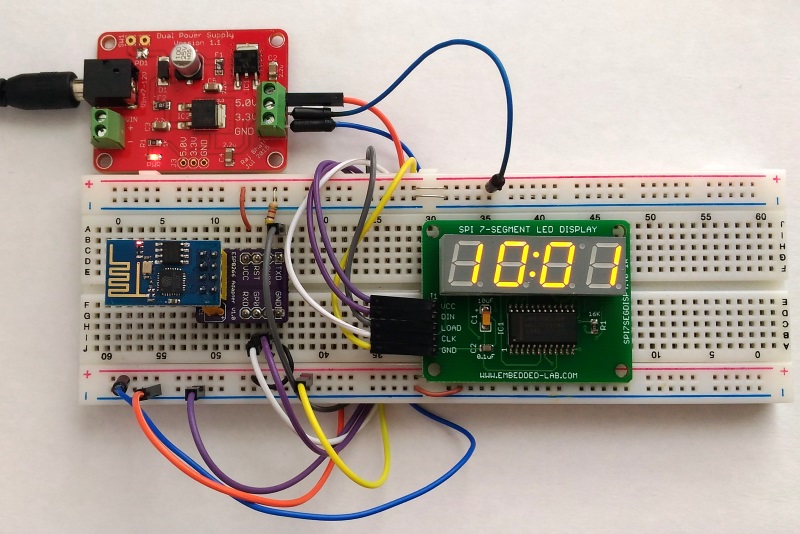
This article describes a ESP8266-based clock project that utilizes NIST's NTS service to retrieve accurate time information and display it on a 4-digit seven segment LED display. The time is synchronized to the NIST server after every 2-minute interval. The display also contains a colon that blinks every second. ESP8266 seven segment LED clock

ESP8266+MAX7219 Clock YouTube
Current local time in USA - Pennsylvania - Philadelphia. Get Philadelphia's weather and area codes, time zone and DST. Explore Philadelphia's sunrise and sunset, moonrise and moonset.